google sheets job application tracker template for a follow-up-ready pipeline that stays organized
Use a google sheets job application tracker template to organize application status and follow-ups in one place. Keep updates reviewable before you submit.

Free Chrome extension
Track all your applications in one place
JobWizard auto-tracks status changes across Workday, Greenhouse, and every major job site — free.
A google sheets job application tracker template helps you stay on top of status and next steps—without losing details.
If your job search feels like it’s running faster than your memory, a google sheets job application tracker template turns scattered emails, portals, and spreadsheets into one follow-up-ready pipeline. The goal isn’t “track everything forever”—it’s to know what’s happening now, what’s next, and what you said last time.
In a well-built tracker, every row represents one application. Each row should answer three questions at a glance: Where is it in the process? What should you do next? And what evidence do you have (posting link, email thread, submission date) to support your next action?
Below is a practical template structure you can copy into Google Sheets, plus a workflow that keeps updates reviewable—so your tracker doesn’t become a guess-and-check guessing game.
Design your tracker tabs: one for applications, one for follow-ups, and one for references.
Start with a simple multi-tab layout so you can scan quickly and still drill down when you need details. A good google sheets job application tracker template usually has three tabs: “Applications,” “Follow-Ups,” and “References.”
Here’s a structure that stays manageable even after you’ve applied to dozens of roles.
Tab 1: Applications (your single source of truth)
- Role: Job title + short identifier (e.g., “Data Analyst — ABC”).
- Company: Employer name.
- Location: City/remote/hybrid.
- Applied Date: The date you submitted.
- Application Link: URL to the posting or portal entry (optional but helpful).
- Status: A controlled list (examples below).
- Source: Where you found it (LinkedIn, company site, referral, etc.).
- Next Follow-Up Date: The date you plan to follow up (or “N/A”).
- Last Follow-Up Date: When you last contacted them.
- Notes: What you did, what you noticed, and any relevant context.
- Attachments/Links: Cover letter, resume version, or email thread links.
Use a tight “Status” list (so it stays accurate)
Instead of free-form statuses, use a dropdown-style approach. For example:
- Submitted
- Under Review
- Assessment / Questionnaire
- Interview Scheduled
- Offer / Next Round
- Rejected
- Withdrawn / No Longer Considering
- Unknown (use only when you truly can’t confirm)
Tab 2: Follow-Ups (your calendar view)
- Due Date: Pull from “Next Follow-Up Date.”
- Company + Role: Human-readable summary.
- Status at Follow-Up: Copy from Applications.
- Follow-Up Type: “Initial follow-up” vs “second follow-up.”
- Message Draft: A short note or pasted template version you’ll customize.
- Sent?: Yes/No (and date sent).
Tab 3: References (so you don’t hunt for context)
- Company research links: Press releases, team pages, product pages.
- Role requirements snapshot: Key skills, responsibilities, must-haves.
- Your versioning notes: Which resume version you used for which role.
Copy a ready-to-use Google Sheets workflow: apply, update, then follow up from a “due” view.
The biggest mistake people make is treating the tracker like a diary instead of a workflow. Your google sheets job application tracker template should support a repeatable loop: apply → record → review → follow up.
Step-by-step workflow you can run every week
- Apply: Submit through the job portal or email process you’re using for that role.
- Immediately log the row: Create (or update) the application entry with the date and status “Submitted.”
- Set the “Next Follow-Up Date”: Choose your cadence and write it down in the same moment.
- Capture evidence: Paste the posting link and (if available) a portal confirmation link or email thread.
- Draft from the follow-up tab: Use a template as a starting point, then customize to the specific role.
- Review before you send: Confirm the role, date applied, and what changed since you applied.
To connect your workflow to stronger follow-up planning, pair your tracker with these JobWizard resources:
- Job Application Tracker Template: Build a Simple Workflow to Track Status, Next Steps, and Follow-Ups (a complementary workflow if you want a lighter version).
- What to Say to Follow Up on a Job Application: Exact Lines, Timing, and Templates (draft wording you can adapt).
- Follow Up Email for Job: A Reply-Focused Plan (Templates + Job Tracker) (when they respond and you need next-step clarity).
Where JobWizard fits (and how to keep it reviewable)
If you would rather not maintain the sheet by hand, JobWizard’s free job application tracker does the same job as a kanban board: every application you send with the extension is logged automatically with the company, role, and date, and you move cards from Applied to Interviewing to Offered as things happen. The spreadsheet below still works well if you like formulas; the board means you never have to remember to fill it in.
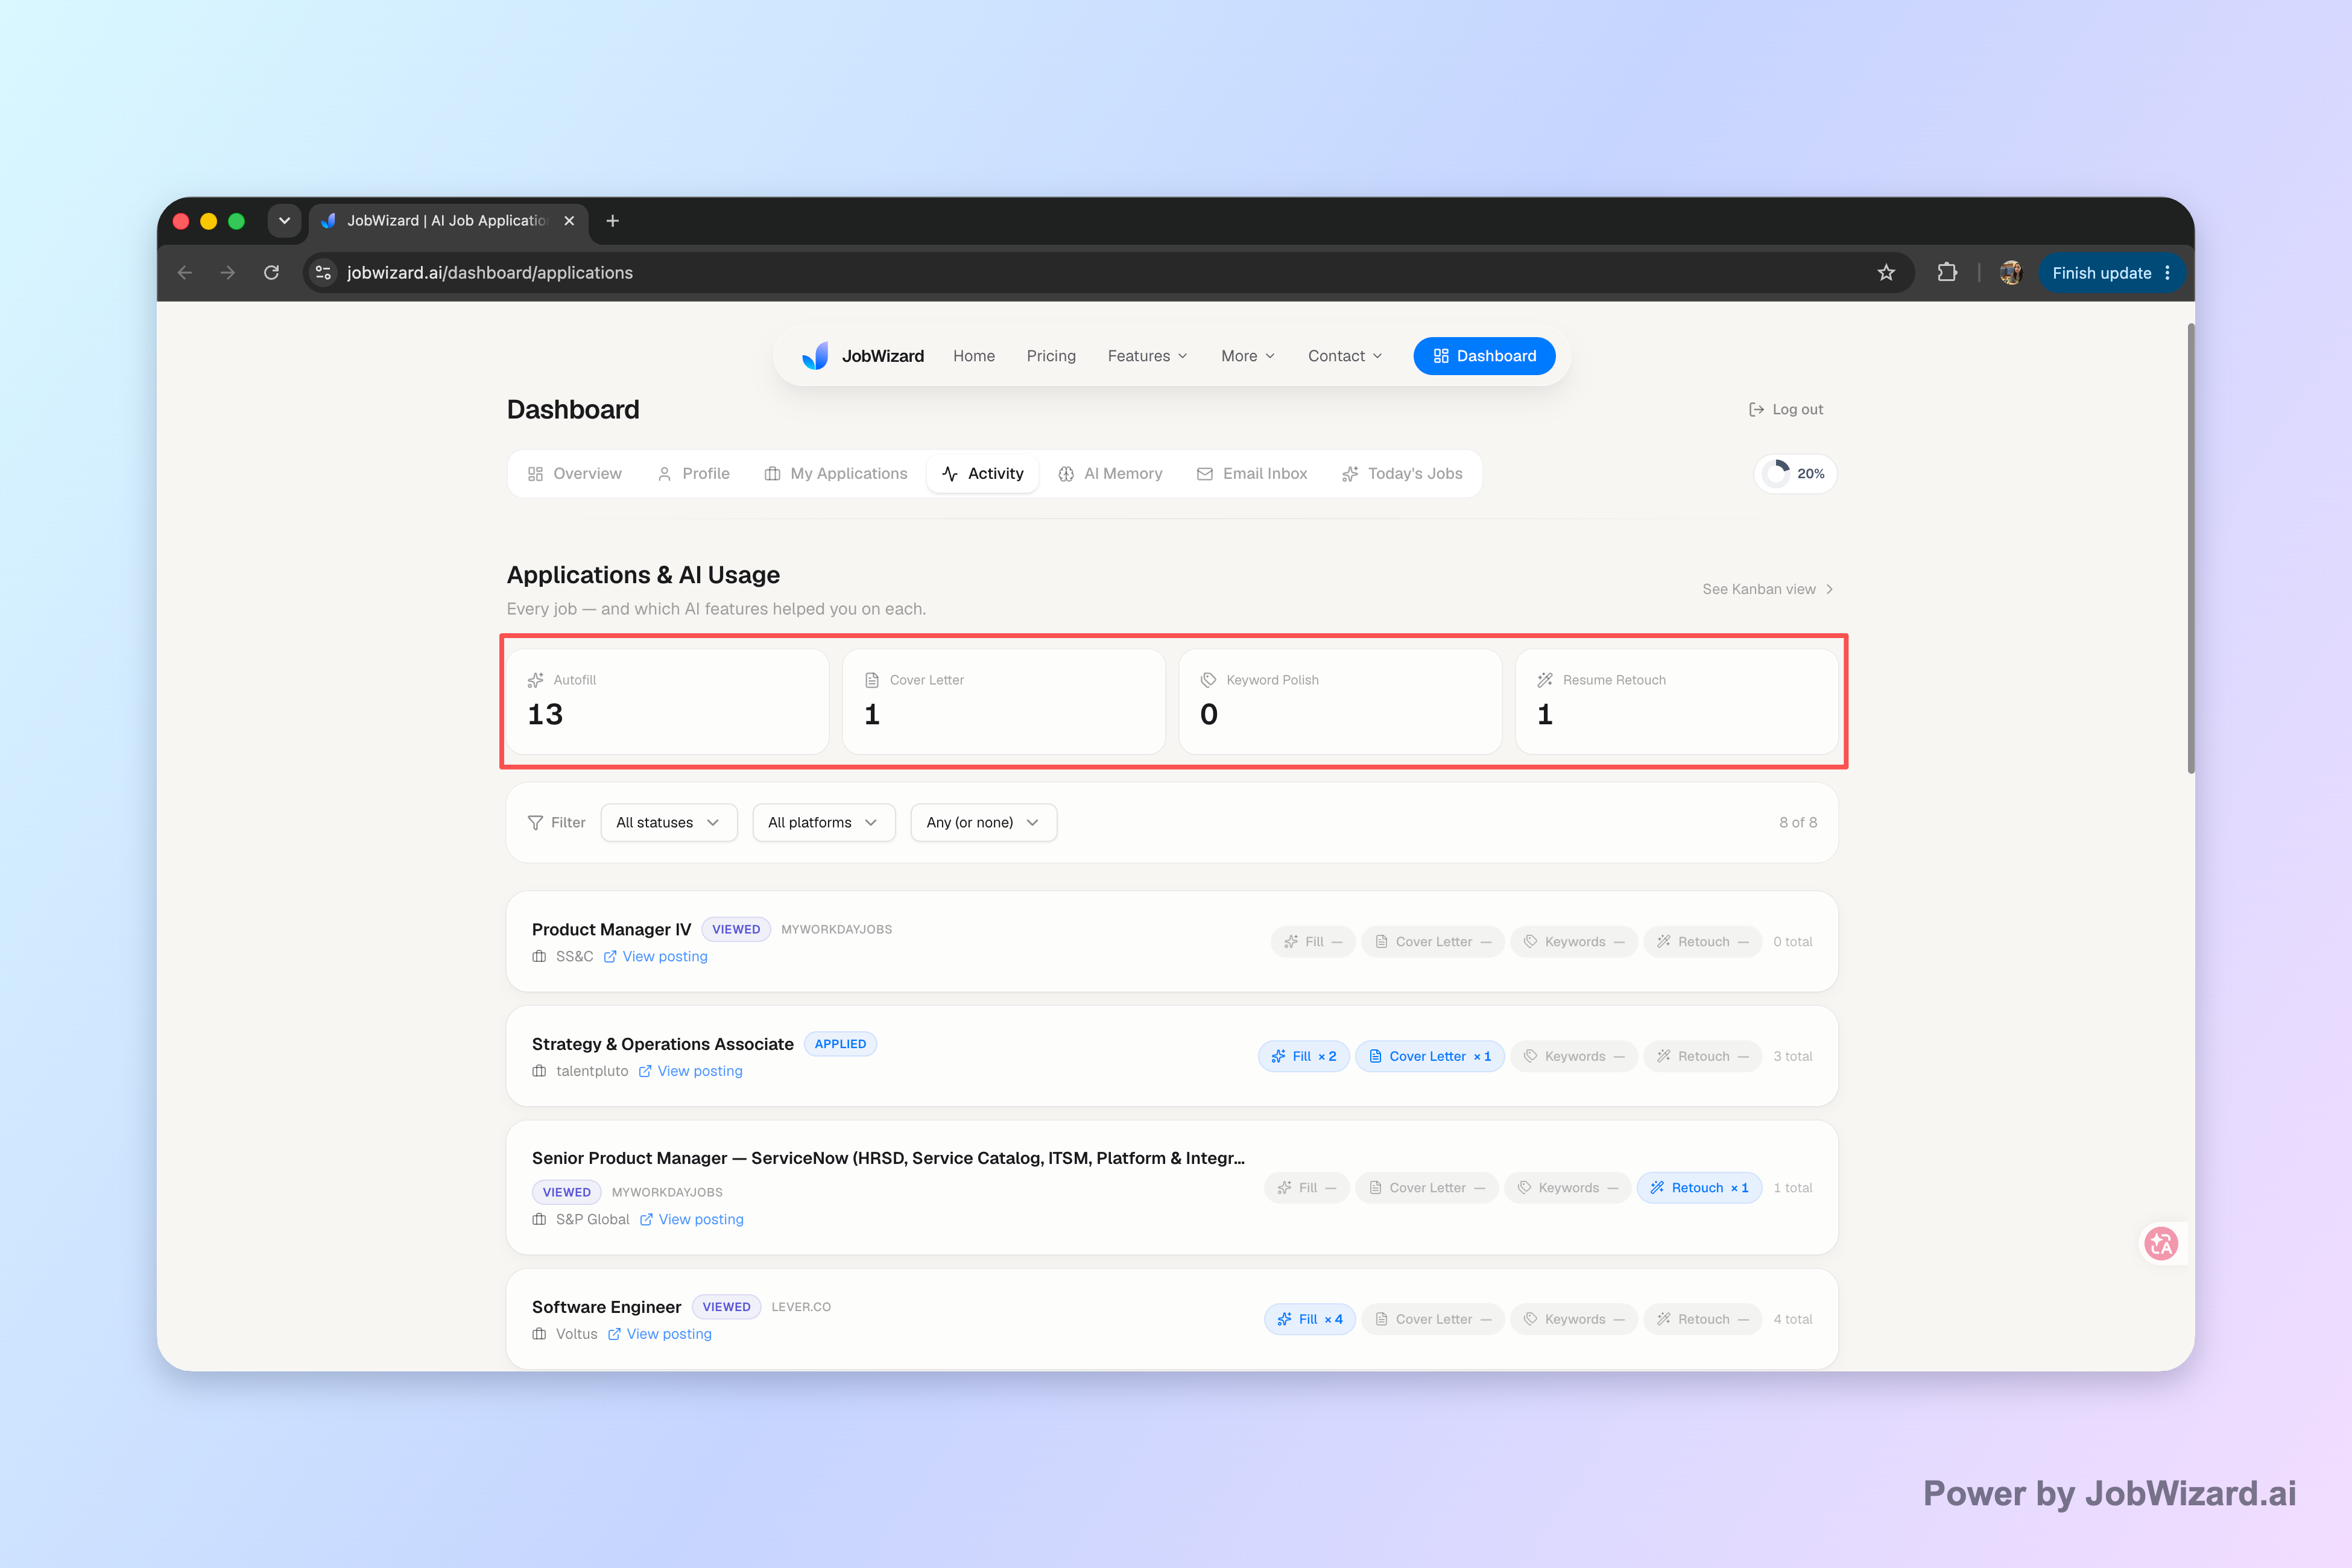
If you use JobWizard, you can align your spreadsheet with what happens during the application activity. JobWizard’s Activity view shows application status and which JobWizard tools were used for each role.
Key point: treat the tracker as your command center and keep your own review-before-submit step for any custom items (like role-specific questions). JobWizard helps fill repetitive fields quickly, while you review sponsorship/salary/EEO/custom questions before submitting.
Make the template “follow-up ready” with formulas, reminders, and smart status rules.
A follow-up-ready google sheets job application tracker template doesn’t just store data—it highlights what you should do next. You can do that with simple filters and a few spreadsheet guardrails.
Turn due dates into a “What to do today” list
In “Follow-Ups,” create a view that shows only rows with a Due Date that’s today (or overdue). You can do this with a filter, or by using a helper column that marks “Due” vs “Not due” based on the date.
- Due: Next Follow-Up Date <= today
- Upcoming: Next Follow-Up Date > today
- N/A: No follow-up scheduled
Add “status rules” so notes don’t contradict reality
Set simple conventions like these:
- If Status is Rejected, set Next Follow-Up Date to N/A and add a brief note with the date and source.
- If Status becomes Interview Scheduled, remove due follow-ups for that job (or set a new “next step” date for the interview-related action).
- If Status is Under Review, keep the follow-up cadence consistent with your last follow-up note.
Track “what changed” since you applied
This is the fastest way to improve your follow-ups. In your Notes column, add a pattern you can reuse:
- Change log: “Portal updated: Assessment invited (date).”
- Evidence: “Email received from recruiting (thread link).”
- Next step: “Follow-up moved to (date) based on response time.”
Usage perspective (for context): JobWizard is used to submit and autofill repetitive application fields—720,000+ applications submitted and 600,000+ autofill sessions run through JobWizard. Autofill typically covers ~18 repetitive fields per application (often 11–23), while you review before submitting sponsorship/salary/EEO and custom questions.
Template examples: fill-in-ready rows for common job search scenarios.
Here are realistic example entries you can copy into your sheet so you don’t stare at blank cells when you’re tired.
Example row: You applied and want a first follow-up
- Company: Acme Robotics
- Role: Product Analyst (Remote)
- Applied Date: 2026-08-03
- Status: Submitted
- Next Follow-Up Date: 2026-08-10
- Notes: “Submitted via portal. Confirmation email received.”
- Attachments/Links: “Portal confirmation link + resume v3 link.”
Example row: They replied—now you need the next-step message
- Company: Northwind Logistics
- Role: Operations Coordinator
- Applied Date: 2026-07-28
- Status: Assessment / Questionnaire
- Last Follow-Up Date: 2026-08-02
- Next Follow-Up Date: 2026-08-06 (after expected response window)
- Notes: “Recruiter emailed asking availability for screening. Reply sent.”
When you’re replying, it helps to keep your tracker and message plan aligned. Use Follow Up Email for Job: A Reply-Focused Plan (Templates + Job Tracker) to structure what you say next based on the recruiter’s message.
Example row: Rejection—close the loop cleanly
- Company: BrightPeak Health
- Role: Data Engineer
- Applied Date: 2026-07-15
- Status: Rejected
- Next Follow-Up Date: N/A
- Notes: “Rejection email received (date). Archive this role.”
Do this automatically with JobWizard
Skip the manual work — JobWizard's Application Tracker handles this for you.
FAQ: quick answers about using a google sheets job application tracker template.
What columns should I include in a google sheets job application tracker template?
Use columns that capture (1) company + role, (2) date applied, (3) application status, (4) next follow-up date, (5) follow-up notes, and (6) links to the posting or your submission. If you use JobWizard, you can also note which tool was used so you can quickly understand what happened during the process.
How do I keep my application tracker accurate without guessing?
Treat the tracker as your single source of truth and update it the moment you learn something new (portal changes, email replies, interview invites, or rejection notices). Avoid relying on assumptions—when you have a question, check the job portal or the email thread before updating status.
Should I automate follow-ups, or do them manually from the tracker?
A safe approach is to use your tracker to schedule and draft follow-ups, then review the message content yourself before you send anything. That way your timing and details match the specific role, and you reduce the risk of sending the wrong template to the wrong job.
Can JobWizard help with application activity tracking alongside my Google Sheets tracker?
Yes. JobWizard’s Activity view shows application status and which JobWizard tools were used for each role, so your spreadsheet can stay aligned with what you did. Keep the final “review-before-submit” step in your hands so custom questions, sponsorship/salary/EEO items, and role-specific details are verified.
How often should I follow up after applying?
Use your next follow-up date column as your cadence tool. Update it based on what the employer says (or your best judgment), and make sure each follow-up note ties back to that specific job and date you applied so your outreach stays consistent.
Ready to make your pipeline easier to run? Keep your google sheets job application tracker template as the brain, then use JobWizard’s Activity view to stay aligned on application status and which tools were used—so you can focus your time on reviewing details and sending follow-ups that are specific to each role.
Frequently Asked Questions
Track all your applications in one place
JobWizard auto-tracks status changes across Workday, Greenhouse, and every major job site — free.