Job Application Tracker Template: Build a Simple Workflow to Track Status, Next Steps, and Follow-Ups
A job application tracker template you can actually use: organize application status, notes, and follow-up reminders in one workflow—then review before you submit.
Free Chrome extension
Track all your applications in one place
JobWizard auto-tracks status changes across Workday, Greenhouse, and every major job site — free.
Job application tracking fails when your “system” lives in your head. If you’re applying to multiple roles, it’s easy to lose the thread—what you applied for, where the process stands, and when you promised yourself you’d follow up. This job application tracker template is built to prevent that exact breakdown: it keeps statuses grounded in evidence, makes next steps impossible to miss, and pairs cleanly with your application workflow (including tools like JobWizard).
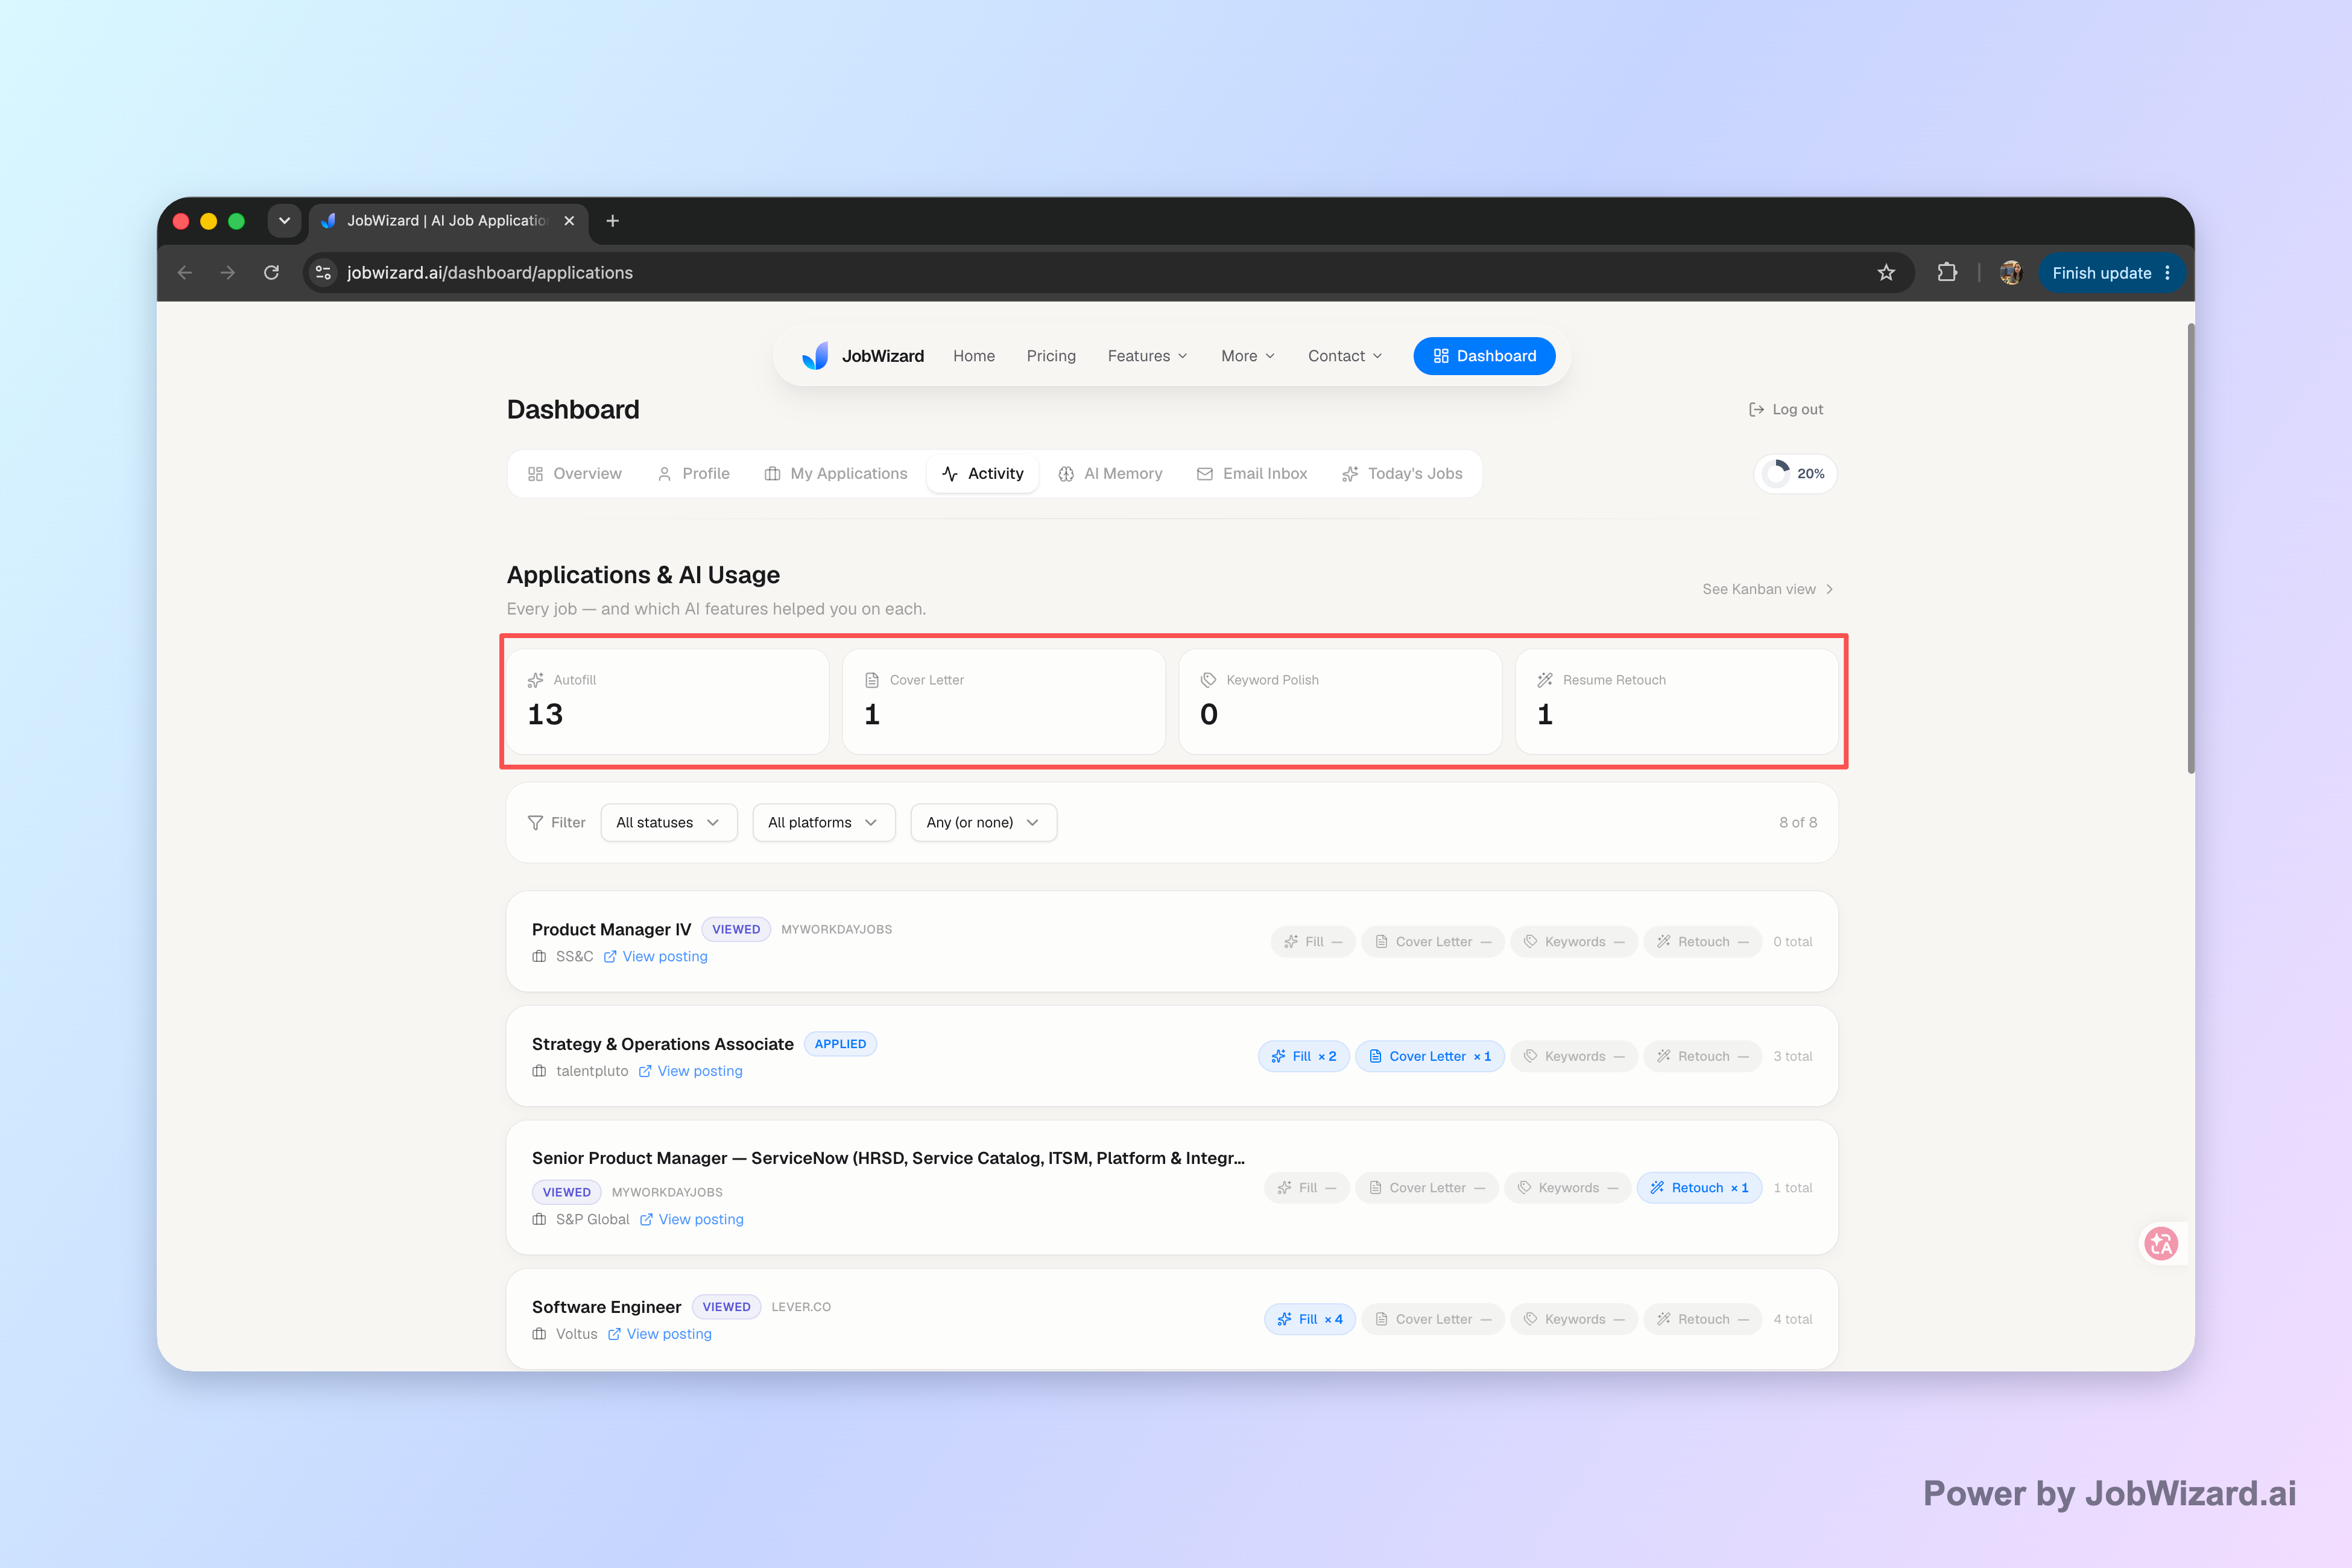
Your best template is the one you’ll update. In practice, that means tying each application to the last action you took and the next action you’ll take—rather than trying to “predict” where hiring is at. JobWizard’s Activity view supports this by showing application status and which JobWizard tools were used for each role, so you can keep your tracking consistent while you review what’s ready to submit.
How to use a job application tracker template that actually matches your workflow
The goal of a tracker is clarity on next steps, not perfect data. Your template should reduce mental load: you should be able to open it once, sort by what’s waiting on you, and know exactly what to do today.
Start by deciding what counts as “update-worthy.” A good rule: only change status when something observable happens (confirmation email, recruiter reply, interview invite), or when you perform an explicit action (submitted, follow-up sent). That keeps your data honest and prevents the tracker from becoming a guess log.
1) Use a status model you can update fast
Pick a small set of statuses you can maintain. If you use too many, you’ll stop updating. A practical set:
- Submitted — you sent the application (include date and source/confirmation link).
- In review — you received proof of receipt or an early-stage response.
- Assessment/OA — you were asked to complete tests or questionnaires.
- Interview — scheduled or completed.
- Follow-up sent — you proactively contacted; capture the date.
- Closed — rejected, withdrawn, or no longer under consideration.
Important: don’t claim your tracker will detect every update automatically or improve hiring outcomes. Treat it as a workflow tool—autofill and assistive tooling can reduce repetitive typing, but you’re still the decision-maker reviewing and submitting applications.
2) Add “next step” fields that drive action
Status without next step is information, not progress. For each application, include a single “next action” target so you never wonder what to do.
- Next step: follow-up email, recruiter message, or interview prep task.
- Next follow-up date: a calendar-driven reminder date.
- Owner: you (and optionally “team” if you’re collaborating).
- What to reference: job posting link, resume version used, or application confirmation.
Build your job application tracker template (fields + example rows)
A solid template is just the right columns plus repeatable entries. Below is a field list you can copy into a spreadsheet, Notion table, or a lightweight tracker. Then we’ll show example rows so you can see what “good data” looks like.
Template fields (copy/paste list)
Use these columns to track status, evidence, and follow-ups.
| Column | What to put here | Why it matters |
|---|---|---|
| Company | Company name (as shown on posting) | Instant scanning + sorting |
| Role title | Exact job title + level (if given) | Avoids mixing similar roles |
| Application date | Date you submitted + timezone if relevant | Sets follow-up cadence |
| Source link | Job posting URL or ATS link | Helps you verify details |
| Confirmation / evidence | ATS confirmation email text snippet or link | Keeps “status” grounded |
| Current status | One of your controlled status labels | Stops guesswork |
| Last update date | When you changed status or sent follow-up | Helps you see “stale” items |
| Next step | One clear action (e.g., “Follow up email #1”) | Turns tracking into execution |
| Next follow-up date | Calendar target date | Prevents missed outreach |
| Contact (if known) | Recruiter name + email or LinkedIn | Improves follow-up relevance |
| Notes (1–2 lines) | Anything actionable (topics discussed, OA status) | Preps your next message |
| Template used | Which follow-up template or script you used | Creates consistency |
Example rows (realistic starter data)
These sample entries show exactly what to write down.
- Company: Acme Health Tech | Role: Product Analyst (Mid) | Application date: 6/20 | Status: Submitted | Next step: Follow-up email #1 | Next follow-up date: 6/27 | Evidence: “Application received” confirmation email.
- Company: Northwind Logistics | Role: Data Analyst (Operations) | Application date: 6/12 | Status: Assessment/OA | Next step: Complete OA | Next follow-up date: 6/19 | Notes: “OA invite on 6/12; due 6/19.”
- Company: BrightPeak Finance | Role: BI Analyst | Application date: 5/29 | Status: Interview | Next step: Send thank-you email | Next follow-up date: 6/6 | Evidence: Interview confirmation + calendar event.
If you want a broader system view, read How to Track Job Applications: A Practical System (JobWizard + Beyond) to connect the dots between your tracker and your weekly execution.
Make follow-ups part of your job application tracker template (not an afterthought)
Follow-ups should be scheduled from your tracker, not remembered later. The easiest way to stay consistent is to treat “next follow-up date” as a workflow trigger.
Turn “next follow-up date” into a repeatable cadence
Use a simple rule for timing, then adjust based on evidence. For example:
- Day 0: Submit application and record confirmation evidence.
- Day 7: If no response, send follow-up email #1 and update status to “Follow-up sent.”
- Day 14: If still no response, send follow-up email #2 (or switch to a different channel if you have a recruiter contact).
- Interview window: After interviews, send thank-you and update your next step to “waiting” only if you have evidence.
When you write those emails, keep them short and specific to the role. For templates and a tracking workflow that fits the same mindset, use Follow Up Email After Job Application: 9 Templates + a Tracking System That Gets Replies.
Capture “what you referenced” to personalize quickly
Your next message should reuse the right details. In your tracker notes, store what your follow-up should reference (assessment completion, conversation topic, or the exact role title). That reduces the time you spend re-reading job descriptions and chasing down links.
To connect this back to spreadsheet-style tracking, see Job Tracker Spreadsheet: Build a Simple System to Track Applications and Follow Up for a column approach that naturally supports next-step reminders.
How JobWizard fits into your job application tracker template (without replacing your review)
JobWizard complements your tracker by reducing repetitive work while keeping you in control. The key is to use it for speed on the parts that don’t change per application, while you keep ownership of the parts that do.
JobWizard’s Activity view is designed around your tracking need: it shows application status and which JobWizard tools were used for each role. That helps you keep your tracker accurate without losing context when you return to an application later.
What to track when you use autofill tools
Assume your tracker is the source of truth for “what’s next.” Use JobWizard to handle repetitive fields, then update your tracker after you review-before-submit decisions.
Reality check: JobWizard runs autofill for repetitive fields while you review sponsorship/salary/EEO/custom questions before submitting. Your job application tracker template should reflect that human review step—so your statuses and next steps remain trustworthy.
In aggregate usage data, JobWizard has supported 720,000+ applications submitted and 600,000+ autofill sessions run. It autofills an average of ~18 repetitive fields per application (typically 11–23). About ~65% of applications are on Workday, ~19% Greenhouse, ~12% Ashby, and ~4% Lever—Workday is where it saves the most time. Treat these as context for why keeping review-before-submit in your workflow matters, not as a promise that every update is automatic.
If you want the larger end-to-end system for tracking + autofills + follow-ups, start with Job Tracker That Actually Helps: Track Applications, Autofills, and Follow-Ups.
Common mistakes (and fixes) when you use a job application tracker template
Most tracker failures are setup problems, not motivation problems. Here are the issues that cause chaos—and what to do instead.
Mistake 1: Too many fields, no action
If your template is a form, it won’t stay updated. Keep “next step” front and center. If a column doesn’t help you decide what to do next, reduce it or move it to notes.
Mistake 2: Updating statuses based on hope
Speculation turns into incorrect follow-ups. Only update status when you have evidence (email, portal update, interview scheduling). Use notes to capture the source and date.
Mistake 3: Missing follow-up dates
Forgetting follow-ups is the fastest way to lose momentum. Make “next follow-up date” part of your weekly review. If you’re using a calendar reminder, also store the date in the tracker so everything stays consistent.
Mistake 4: Not reusing information between roles
Personalization doesn’t have to be slow. Keep “what to reference” in the notes so you can write follow-ups without searching for the job link every time.
Done well, your job application tracker template becomes a short feedback loop: apply → record evidence → choose next step → update status → move on.
Do this automatically with JobWizard
Skip the manual work — JobWizard's Application Tracker handles this for you.
FAQ
Quick answers to the most common questions about building a job application tracker template. If you want to set up a tracker fast, focus on the fields and cadence below.
What should a job application tracker template include?
Your template should include each company + role, application date, current application status, key links (posting/ATS confirmation), contact or recruiter details, and a clear “next step” (like a follow-up date or reminder). If you use a tool like JobWizard, add fields for which roles were filled and what you still need to review before submitting.
How do I track application status without guessing?
Use whatever “truth” you have: ATS confirmation emails, calendar events, recruiter replies, and the last action you took. Update the status based on events (submitted, in review, interview, offer, rejected) and add a note with the source (e.g., “received OA invite email on 6/10”). Avoid treating speculation as status.
Should I use a spreadsheet or a tracker app for my job application tracker template?
Choose what you’ll consistently maintain. A spreadsheet works well if you like columns and quick sorting; a tracker app can reduce friction when you need to review application details frequently. Either way, the “win” is the same: keep next steps visible and update statuses only when you have evidence.
How often should I update my job application tracker template?
Update it immediately after any meaningful event: when you submit, when you receive an email, after an interview, and when you draft/send a follow-up. If you’re busy, do a short daily or 2–3x/week review so nothing ages past your follow-up window.
Can JobWizard help me use my job application tracker template more effectively?
Yes. JobWizard’s Activity view helps you see application status and which JobWizard tools were used for each role, so you can keep your tracker accurate and focus on the items that need your review before submitting. Keep sponsorship/salary/EEO/custom questions in your “review before submit” step rather than assuming everything auto-fills perfectly.
Ready to stop losing track? Start by using this job application tracker template workflow—then keep each application and its next step aligned using JobWizard’s Activity view so you can review, update statuses with evidence, and follow up on time.
Frequently Asked Questions
Track all your applications in one place
JobWizard auto-tracks status changes across Workday, Greenhouse, and every major job site — free.