Job Application Tracker Google Sheets: Build a Status + Follow-Up System You’ll Actually Use
Use a job application tracker Google Sheets setup to keep every role, status, and follow-up step in one place. Then streamline repetitive fields with JobWizard while you review before submitting.
Free Chrome extension
Track all your applications in one place
JobWizard auto-tracks status changes across Workday, Greenhouse, and every major job site — free.
Job application tracker Google Sheets: turn chaos into a simple status + follow-up system
If you’ve ever asked, “Which roles did I apply to—and when should I follow up?”, a job application tracker Google Sheets setup can end the guesswork by putting every application and next step into one list you can sort and update fast.
The goal isn’t to build a “perfect” spreadsheet—it’s to build a workflow you’ll actually maintain. That means clear columns, a small set of statuses, and follow-ups that are tied to dates instead of memory.
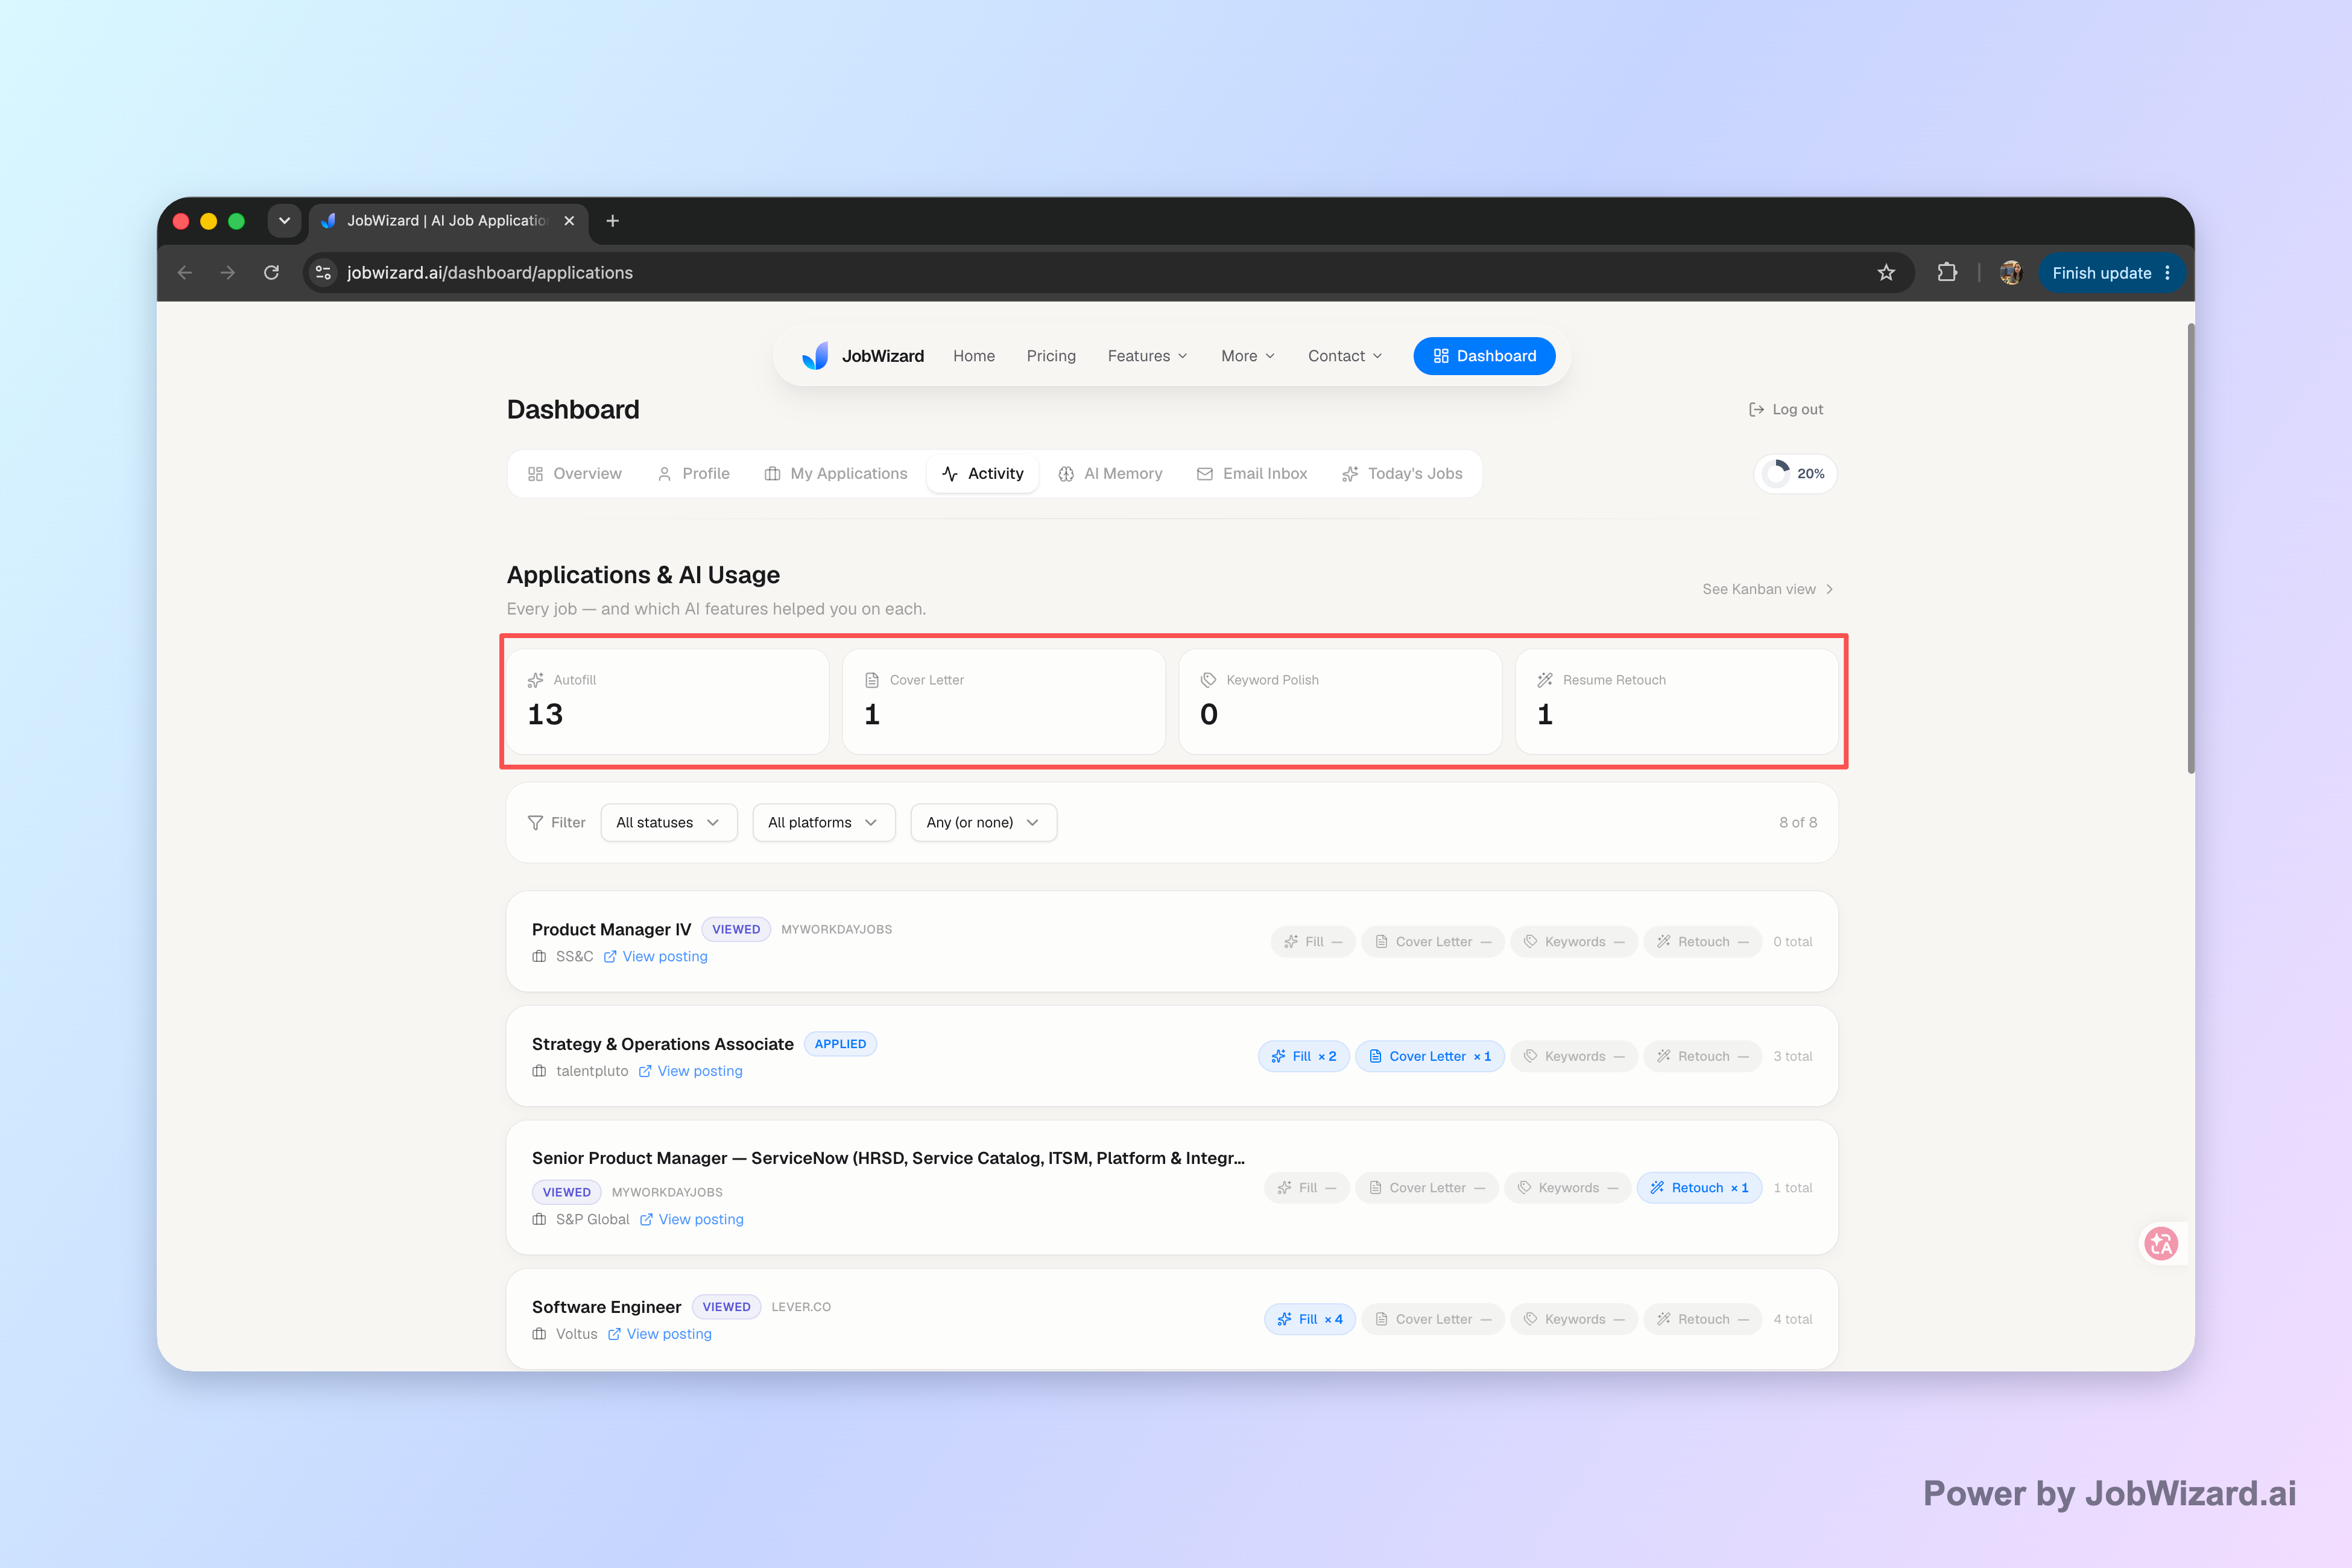
When you apply across multiple companies, you also need visibility into what happened during the application process. The JobWizard Activity view shows where each application stands and which JobWizard tools were used along the way.
Design your Google Sheets tracker: columns and statuses that match real recruiting timelines
Your tracker needs columns that answer six questions quickly: what you applied to, where it is now, and what you’ll do next.
Use the sheet like a “command center.” Every row should represent one job application (or one job posting if you apply more than once to the same role). Then keep your “status” values consistent so sorting and filtering stay useful.
Columns to include (a practical baseline)
- Company — easy filtering for target companies
- Role / Title — prevents “I meant the other analyst role” confusion
- Job Link (URL) — lets you re-check requirements without searching again
- Date Applied — your anchor for follow-up timing
- Status — use a fixed list (next subsection)
- Next Follow-Up Date — your “what’s next” driver
- Contact / Source — recruiter name, referral source, or job board
- Notes — anything you can’t fit into a column (custom questions, salary range, interview prep)
Choose a status list you can update in seconds
Recruiting stages vary, but you can still standardize your tracker. A simple list works because it’s easier to stay consistent.
- Saved — found, not applied yet
- Applied – Pending — waiting on confirmation or review
- Application Reviewed — some signal (recruiter email, portal update)
- Interview — scheduled, in progress, or awaiting follow-up
- Offer — offer received (and track decision in notes if needed)
- Closed — rejected, withdrawn, or no longer relevant
Tip: If you want fewer statuses, keep it to five by merging “Applied – Pending” and “Application Reviewed.” If you want more control, add just one additional status (for example, “Recruiter Screen” vs “Onsite”). Don’t create a status taxonomy that you can’t maintain.
Set up follow-up rules so your tracker tells you what to do next
Follow-ups should feel like a schedule—not a debate—so your Google Sheets job tracker needs a repeatable rule for when to reach out.
Start with a simple cadence and adjust based on what you see in practice (portal updates, recruiter responsiveness, interview stages). The key is that your tracker always shows the next action.
Create a “next step” routine tied to status
- After you apply — set “Next Follow-Up Date” to a chosen number of days from “Date Applied.”
- When status changes — update both “Status” and “Next Follow-Up Date” together (don’t leave dates behind).
- When you get a recruiter update — adjust the date to match the new stage (e.g., after interview scheduling).
- When you’re done — set status to “Closed” so the role stops showing up in your follow-up filters.
Use filters and sorting like a daily checklist
Once “Next Follow-Up Date” exists, your sheet becomes a daily to-do list. Each day, you should be able to open the file and answer: “What follow-ups do I have today (or overdue)?”
- Sort by next follow-up date to see the oldest overdue items first.
- Filter by status to focus only on “Applied – Pending” and “Application Reviewed.”
- Scan notes quickly so your message references the correct role and stage.
As you write follow-ups, keep the “Notes” column as your memory. For example, you might store: who contacted you, the last email date, and the one sentence you want to reuse (with small edits).
Keep message templates inside the tracker
Instead of storing templates somewhere else, put them in the same row so you don’t scramble when you’re ready to send.
- Initial follow-up — short, polite, references the application and asks about timeline.
- Post-interview follow-up — thanks the interviewer and reiterates a fit point.
- No response nudge — brief check-in and reminder of your interest.
If you want a workflow that goes beyond tracking (including a simple template and follow-up plan), these guides can help you structure the same system in a way that’s easy to maintain: How to Track Job Applications: A Practical System (JobWizard + Beyond) and Job Application Tracker Template: Build a Simple Workflow to Track Status, Next Steps, and Follow-Ups.
Where JobWizard fits: autofill repetitive fields while your sheet stays the “source of truth”
You don’t need to choose between “form speed” and “application tracking”—you can run both.
With JobWizard, repetitive fields can be filled quickly during the application process, while you review before submitting the parts that vary by role and company (like sponsorship details, salary inputs, EEO information, and custom questions). Your Google Sheets tracker then records status and next steps after you apply.
What gets faster (and what still needs your review)
JobWizard supports autofill + review-before-submit, so the focus stays on accuracy where it matters most. In JobWizard’s usage, it autofills an average of ~18 repetitive fields per application (typically 11–23), and you still review the final application before submitting.
That balance is exactly what a job application tracker Google Sheets workflow needs: automation for repetitive entry, then a clear record of what happened and what you’ll do next.
Usage context: In aggregate, JobWizard has processed 720,000+ applications submitted and 600,000+ autofill sessions. Workday is where it tends to save the most time (of applications submitted through it: ~65% Workday, ~19% Greenhouse, ~12% Ashby, ~4% Lever).
Link your tracking to application activity (so updates don’t vanish)
Here’s a simple way to connect the two systems without complicating your sheet: keep your Google Sheets as the status ledger, and use JobWizard’s activity view to understand what tools were used along the way.
- In your sheet — update “Status” and “Next Follow-Up Date.”
- In JobWizard — review application activity when you’re preparing follow-ups or re-checking what you entered.
If you want a more spreadsheet-centric approach, try these companion reads: Job Tracker Spreadsheet: Build a Simple System to Track Applications and Follow Up and Job Tracker That Actually Helps: Track Applications, Autofills, and Follow-Ups.
Common mistakes (and fixes) when you use Google Sheets for job application tracking
Most tracker failures happen because the system is either too vague or too complex—fixable issues if you tighten the workflow.
Use these as “quality checks” before you commit to your spreadsheet.
Mistake 1: Too many statuses
If you add statuses for every tiny stage, updating becomes slow and inconsistent. Your sheet stops being a tool and becomes a project.
- Fix: keep 5–6 statuses max and merge the rest into “Notes.”
Mistake 2: No follow-up date
If you only track “Applied” and “Interview,” you’ll still rely on memory.
- Fix: always update “Next Follow-Up Date” whenever status changes.
Mistake 3: Tracking requirements, not actions
A spreadsheet should help you execute next steps. Tracking every requirement from the job post in multiple columns is rarely worth it.
- Fix: use a single “Notes” field for details and keep “Status + Date” as your operational core.
Mistake 4: Forgetting “review before submit”
Automation can speed up data entry, but you should never assume entries are correct for your situation.
- Fix: when you use autofill tools, still review sponsor/salary/EEO/custom questions before submitting, and record any relevant outcomes in your row notes.
Do this automatically with JobWizard
Skip the manual work — JobWizard's Application Tracker handles this for you.
FAQ: job application tracker Google Sheets
What columns should a job application tracker Google Sheets use?
Start with columns that answer: (1) role + company + link, (2) current status, (3) date applied, (4) next follow-up date, (5) contact/person, and (6) notes for custom questions or salary/EEO items. If you use JobWizard, add a small “tool used” or “autofill/review” note so you know what was filled and what you still reviewed before submitting.
How do I handle job application status updates without losing track?
Use a fixed status list (for example: Saved, Applied—Pending, Interview, Offer, Rejected/Closed) and update the status only from that list. Pair each status with a single “next step” rule (e.g., Applied—Pending automatically sets a follow-up date), and keep one notes column for exceptions so you don’t have to redesign the sheet every week.
Should my Google Sheets job tracker include follow-up reminders?
Yes. Add a “next follow-up date” column and sort/filter by that date so you always know what to work on next. For best results, keep your follow-up schedule simple (one or two reminders per stage) and write a template in the notes column for each follow-up type.
Can JobWizard work with a Google Sheets job application tracker?
Yes—use JobWizard for the repetitive form fields during application entry, then keep your spreadsheet as the source of truth for role status and next actions. JobWizard fills repetitive fields fast while you review sponsor/salary/EEO/custom questions before submitting, so your Google Sheets can track outcomes and next steps after you apply.
How do I avoid making the tracker too complicated?
Start with one tab and one workflow. Make your “status” and “next follow-up date” the two most important fields, then keep other details in notes instead of dozens of columns. As you learn, add only one new column at a time—so the tracker gets better without becoming a second job.
Ready to apply faster and track follow-ups with less stress? Set up your Google Sheets job application tracker google sheets workflow for statuses and dates, then use JobWizard to handle repetitive fields during applications—while you review before submitting—so your tracker stays accurate and your next actions stay obvious.
Frequently Asked Questions
Track all your applications in one place
JobWizard auto-tracks status changes across Workday, Greenhouse, and every major job site — free.