excel job application tracker: Build an Activity-First System for “Under Review” and Next Steps
An excel job application tracker shouldn’t just store links—it should help you see application status and act on the right next step. Here’s an Activity-first workflow.
Free Chrome extension
Track all your applications in one place
JobWizard auto-tracks status changes across Workday, Greenhouse, and every major job site — free.
excel job application tracker: turn “applied” into a clear next step
If you’re using an excel job application tracker, your real goal isn’t to log rows—it’s to know what to do after you hit submit. Most candidates stall because they can’t connect application status (like “under review”) to a specific follow-up move.
This guide shows you how to design a tracker that stays simple in Excel, then plug it into JobWizard’s Activity view so you can see application status and the tools used for each role in one place. You still review autofilled content and submit applications yourself—so your tracker becomes the decision hub, not the autopilot.
Start with an Excel layout that’s built for follow-ups, not busywork
Your Excel sheet should answer one question fast: what’s the next step for this role? If a column doesn’t help you take action, remove it.
Copy/paste column set (the “next-step” template)
Here’s a structure that works well for most US job searches. Use it as your baseline, then customize later.
| Column | What to write | Why it matters |
|---|---|---|
| Company | Company name | Quick scanning |
| Role title | Exact job title as posted | Prevents mix-ups |
| Link / reference | Job URL or saved reference | Fast context for follow-ups |
| Date applied | MM/DD/YYYY | Time tracking without guesswork |
| Status (controlled) | Pick from a short set (see below) | Consistency beats chaos |
| Next follow-up date | Your planned check-in date | Keeps you from forgetting |
| Next step | One line: “Email recruiter,” “Check portal,” “Wait 7 days,” etc. | Makes follow-ups actionable |
| Follow-up log | Brief notes + dates (e.g., “Sent email 6/3, no reply yet”) | Stops duplicate outreach |
| Disposition / outcome (optional) | Not retained, interview, withdrawn, etc. | So you can learn and move on |
| Notes | Any job-specific details (skills, contact names) | Personalizes your next message |
Use a small status set (so you actually update it)
Don’t create 30 statuses. Start with 5–7 and stick to them. For example:
- Applied (submitted, waiting)
- Under review (you have a signal that the team is looking)
- In progress (more active movement)
- Not retained (rejected)
- Dispositioned (moved to another internal stage you can’t change)
- Interview status (scheduled, completed, etc.)
Make “Next follow-up date” the dashboard of your life
Now add conditional formatting in Excel so rows visually surface when you should act. The tracker works best when you can open it and instantly see what’s due.
If you want a follow-up workflow, pair this with our guide on Follow Up on Job Application Fast: Use a Job Tracker to See Status, Then Email the Right Next Step.
Connect your tracker to JobWizard Activity for status clarity
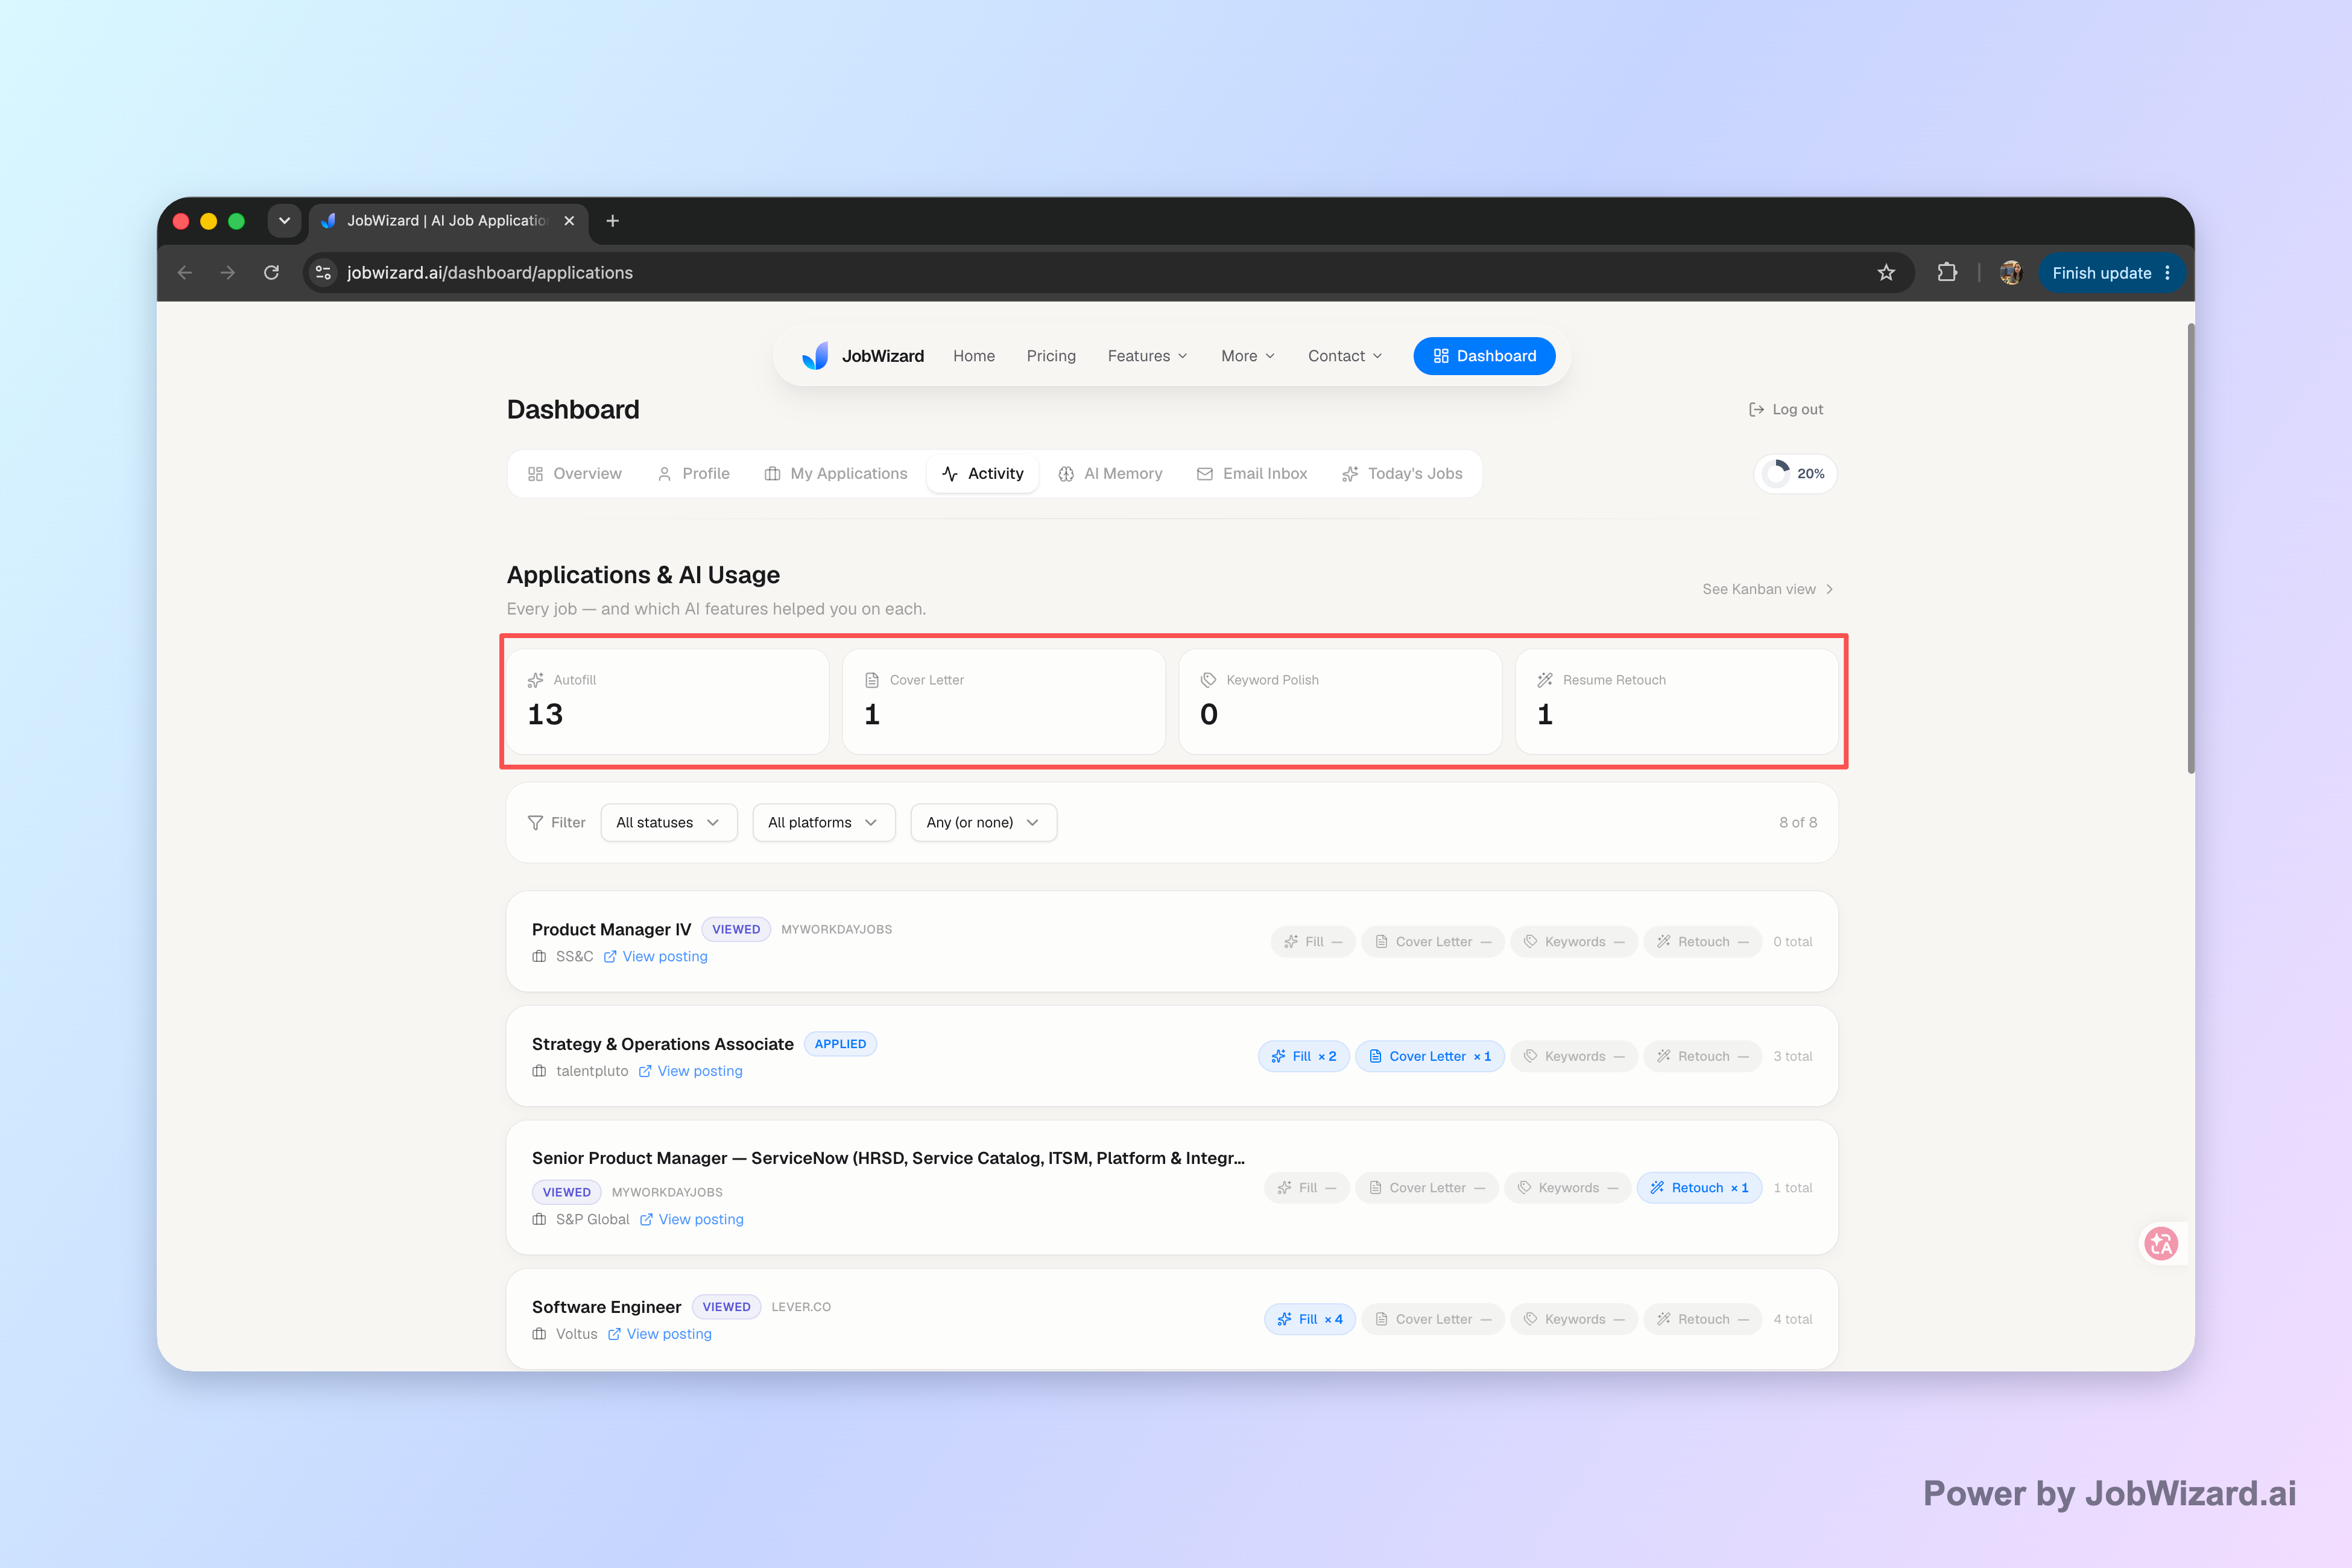
If Excel is your spreadsheet “memory,” JobWizard’s Activity view is your application activity timeline for each role. It shows application status and which JobWizard tools were used for each application.
The point isn’t blind auto-submission. JobWizard autofills repetitive fields so you can move faster, but you review and submit applications yourself, including sponsorship/salary/EEO/custom questions as required by the application.
The Activity view shows where each application stands and which JobWizard tools were used along the way.
How to use both systems without duplicating work
Here’s a practical split that keeps your process clean:
- Excel records the “why”—your next step, follow-up notes, and any job-specific context.
- JobWizard Activity records the “what changed”—status and which JobWizard tools were used per role.
- You decide and update Excel—when you see progress (or you don’t) you adjust “Status,” “Next follow-up date,” and “Next step.”
Use Workday/Greenhouse-heavy workflows strategically
In the JobWizard workflow data, a majority of submitted applications are on Workday, with additional volume on Greenhouse, Ashby, and Lever. Workday is where JobWizard typically saves the most time because of repeated field patterns.
That matters because your tracker should reduce friction where it shows up most often—so you can spend your effort on tailored notes and smart follow-ups, not retyping the same basics.
Why this beats “link soup” (and spreadsheet drift)
Without an activity view, you might log “Applied” and then forget which tools you used or what status you saw last. With Activity + Excel, you can answer: did it move forward, and what should you do next?
For more ideas on the spreadsheet side, see Job Application Tracker Excel: Build a Simple, Follow-Up-Friendly System (Without Losing the Thread).
Build your update routine: what to change, and when
The best excel job application tracker fails if you never update it. Use a repeatable routine that matches your weekly habits.
A simple weekly cadence
- Daily (2–5 minutes): update rows for any new signals (portal change, recruiter reply, interview invite).
- Weekly (10–20 minutes): review “Next follow-up date” and send follow-ups for due roles.
- After interviews (immediately): set “Next step” (thank-you message, recruiter follow-up, or waiting period).
- After outcomes: mark “Not retained” or “Dispositioned” so you don’t keep re-checking.
Rules for updating status without overthinking
When you update a row, keep it “signal-based,” not “hope-based.” Only change status when you have evidence (portal update, email, scheduling, or recruiter communication).
- Under review: update when you have a real signal, not just because you applied.
- Not retained: update when you receive a rejection or clear disposition.
- In progress: update when there’s movement you can reasonably act on (e.g., screening progress).
Keep your follow-up notes “message-ready”
In the “Follow-up log” and “Notes” columns, write details you can reuse:
- Who you contacted (recruiter name, HR email, or portal contact)
- What you said last time (1 line)
- What changed (portfolio review, interview scheduled, feedback received)
- What you’ll ask next (availability, next steps, timeline)
If you want a more “systems” approach beyond Excel basics, pair this routine with How to Track Job Applications: A Practical System (JobWizard + Beyond).
Choose the right tracker format: Excel vs. Google Sheets (and why it matters)
When you search across many roles, consistency is more important than the spreadsheet tool. Excel and Google Sheets can both work—pick based on how you maintain and access your tracker.
Excel: best when you want a stable, offline-friendly system
Excel is a strong fit if you prefer a single file you can update manually and refine with conditional formatting and filters. It’s also handy if your workflow includes local review before sending updates.
Google Sheets: best when you want easy access and quick collaboration
If you prefer editing from multiple devices or want an easy way to keep the tracker current without file juggling, Google Sheets can reduce friction.
For a follow-up-focused template approach, read Google Sheet Job Application Tracker That Actually Keeps Your Follow-Ups Straight (Template + System).
Whichever you choose, keep the same “next-step” logic
Don’t change your tracker philosophy just because the format changes. The key is the same: every application row should tell you what to do next and when to do it.
Do this automatically with JobWizard
Skip the manual work — JobWizard's Gmail auto-tracking handles this for you.
FAQ: excel job application tracker questions job seekers actually ask
What columns should I include in an excel job application tracker?
Use columns for role/company, URL or saved reference, date applied, current status (e.g., “under review” / “in progress” / “not retained”), next follow-up date, follow-up notes, and any disposition details. Then add a “next step” column so you’re never guessing what to do when the status changes.
How do I track application status like “under review” without getting overwhelmed?
Choose a small, consistent set of statuses and only update them when you have a real signal (portal update, recruiter reply, email, or interview scheduling). For each update, write one line about what changed and what you plan to do next—so your follow-ups stay targeted.
Should I use Excel only, or Excel plus JobWizard?
Excel is great as your single source of truth for what you applied to. Pair it with JobWizard’s Activity view to see application status and which JobWizard tools were used for each role. Either way, remember you review autofilled content and submit applications yourself.
Can an application tracker prevent me from losing follow-ups?
Yes—when your tracker is built around the next action. Keep a “next follow-up date” plus “next step” note in your excel job application tracker, and update both whenever status changes. That way, you don’t rely on memory or scattered emails.
Does JobWizard automatically detect every application update?
JobWizard’s tracking is about helping you review your application activity in one place. Don’t assume every external change will be detected automatically or that tracking alone improves hiring outcomes—you still need to review and decide what to do next.
Ready to keep every role and its next step together? Start using JobWizard’s Activity view to see application status and which tools were used for each application, then mirror the “next step” into your excel job application tracker so your follow-ups stay focused.
Try JobWizard and build an Activity-first tracking workflow today.
Frequently Asked Questions
Track all your applications in one place
JobWizard auto-tracks status changes across Workday, Greenhouse, and every major job site — free.